

# 参考文档
一、配置环境
1.1 更新国内镜像源
可以使用如下工具更新镜像源:
sudo wget http://fishros.com/install -O fishros && . fishros1.2 安装依赖包
安装必要的环境依赖包
sudo apt-get install -y build-essential ubuntu-drivers-common net-tools python3 python-is-python3 python3-pip修改pip源为清华源
pip config set global.index-url https://pypi.tuna.tsinghua.edu.cn/simple或者修改配置文件替换pipe国内源地址
mkdir -p ~/.pip && tee ~/.pip/pip.conf > /dev/null <<EOF
[global]
index-url = https://pypi.tuna.tsinghua.edu.cn/simple
[install]
trusted-host = pypi.tuna.tsinghua.edu.cn
EOF
执行验证:
pip config list
# global.index-url='https://pypi.tuna.tsinghua.edu.cn/simple'
# install.trusted-host='https://pypi.tuna.tsinghua.edu.cn'
1.3 安装docker
具体安装步骤参考ubuntu安装docker官方文档
简单直接的安装方式参考如下:
 sudo apt install -y docker.io
 # 将当前用户加入docker组
 sudo usermod -aG docker ${USER}
1.4 拉取pytorch docker镜像
前往pytorch 官方docker镜像寻找自己合适版本,yolov5要求1.8以上版本,我拉取1.13版本,执行命令:
sudo docker pull pytorch/pytorch:1.13.1-cuda11.6-cudnn8-runtime1.4 安装nvidia驱动
我们使用pytorch-docker环境无需安装cuda,NVIDIA驱动简单安装如下
禁用
nouveau驱动
编辑 /etc/modprobe.d/blacklist-nouveau.conf 文件,添加以下内容:
blacklist nouveau
blacklist lbm-nouveau
options nouveau modeset=0
alias nouveau off
alias lbm-nouveau off
关闭nouveau
echo options nouveau modeset=0 | sudo tee -a /etc/modprobe.d/nouveau-kms.conf重新生成内核并重启
sudo update-initramfs -u
sudo reboot
重启后验证
重启后,执行lsmod | grep nouveau。如果没有屏幕输出,说明禁用nouveau成功
查找推荐驱动
ubuntu-drivers devices
# 输出如下
# modalias : pci:v000010DEd00001EB8sv000010DEsd000012A2bc03sc02i00
# vendor   : NVIDIA Corporation
# model    : TU104GL [Tesla T4]
# driver   : nvidia-driver-450-server - distro non-free
# driver   : nvidia-driver-525-server - distro non-free
# driver   : nvidia-driver-535-server - distro non-free
# driver   : nvidia-driver-418-server - distro non-free
# driver   : nvidia-driver-525 - distro non-free
# driver   : nvidia-driver-470 - distro non-free
# driver   : nvidia-driver-470-server - distro non-free
# driver   : nvidia-driver-535 - distro non-free recommended
# driver   : xserver-xorg-video-nouveau - distro free builtin
安装推荐的驱动程序
根据自己系统选择安装,安装完成后重启
sudo apt install nvidia-driver-535-server重启后验证
nvidia-smi 命令能够输出显卡信息则验证成功
二、训练数据集
2.1 下载yolov5代码
前往github下载代码,或者准备自己的yolov5训练代码,如果是拷贝他人代码,将git目录删除,否则后续训练时检查git信息会报错。
git clone git@github.com:ultralytics/yolov5.git2.2 启动进入pytorch-docker
# 映射宿主机地址到docker内部,根据显卡实际情况指定显存容量
docker run -v /home/lishi/object-detect/:/workspace --gpus all --ipc=host -p 6006:6006 -it pytorch/pytorch:1.13.1-cuda11.6-cudnn8-runtime /bin/bash后续都将在docker中执行;
2.3 安装依赖项
在docker下进入yolov5代码目录下将request.txt的opencv注释掉然后执行依赖项安装
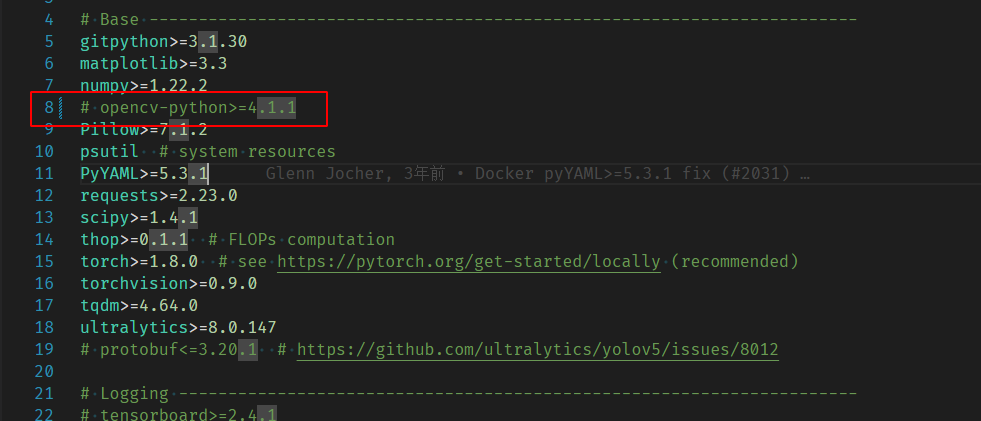
pip3 install -r requirements.txt -i http://mirrors.aliyun.com/pypi/simple/ --trusted-host mirrors.aliyun.com继续安装opencv-python-headless版本opencv;
pip3 install opencv-python-headless -i http://mirrors.aliyun.com/pypi/simple/ --trusted-host mirrors.aliyun.com2.4 准备训练数据集
2.4.1 VOC数据集
VOC数据集需要转换为YOLO数据集训练,转换下方转换代码,修改CLASSES和PATH:
import xml.etree.ElementTree as ET
import pickle
import os
from os import listdir, getcwd
from os.path import join
import random
from shutil import copyfile
from PIL import Image

# 只要改下面的CLASSES和PATH就可以了,其他的不用改,这个脚本会自动划分数据集,生成YOLO格式的标签文件
# 分类名称  这里改成数据集的分类名称,一定要改!!!请查看数据集目录下的txt文件
CLASSES = ["belt", "nobelt"]
# 数据集目录 这里改成数据集的根目录,根目录下有两个文件夹Annotations和JPEGImages,一定要改!!!
PATH = r'/home/lishi/object-detect/Helmet/data-images'
# 训练集占比80% 训练集:验证集=8:2 这里划分数据集 不用改
TRAIN_RATIO = 80
def clear_hidden_files(path):
    dir_list = os.listdir(path)
    for i in dir_list:
        abspath = os.path.join(os.path.abspath(path), i)
        if os.path.isfile(abspath):
            if i.startswith("._"):
                os.remove(abspath)
        else:
            clear_hidden_files(abspath)


def convert(size, box):
    dw = 1. / size[0]
    dh = 1. / size[1]
    x = (box[0] + box[1]) / 2.0
    y = (box[2] + box[3]) / 2.0
    w = box[1] - box[0]
    h = box[3] - box[2]
    x = x * dw
    w = w * dw
    y = y * dh
    h = h * dh
    return (x, y, w, h)


def convert_annotation(image_id):
    # Assuming the image format is jpg
    image_path = os.path.join(image_dir, f"{image_id}.jpg")
    img = Image.open(image_path)
    w, h = img.size
    in_file = open(PATH+'/Annotations/%s.xml' % image_id, encoding='utf-8')
    out_file = open(PATH+'/YOLOLabels/%s.txt' %
                    image_id, 'w', encoding='utf-8')
    tree = ET.parse(in_file)
    root = tree.getroot()
    size = root.find('size')
    # w = int(size.find('width').text)
    # h = int(size.find('height').text)
    difficult = 0
    for obj in root.iter('object'):
        if obj.find('difficult'):
            difficult = obj.find('difficult').text
        cls = obj.find('name').text
        if cls not in CLASSES or int(difficult) == 1:
            continue
        cls_id = CLASSES.index(cls)
        xmlbox = obj.find('bndbox')
        b = (float(xmlbox.find('xmin').text), float(xmlbox.find('xmax').text), float(xmlbox.find('ymin').text),
             float(xmlbox.find('ymax').text))
        bb = convert((w, h), b)
        out_file.write(str(cls_id) + " " +
                       " ".join([str(a) for a in bb]) + '\n')
    in_file.close()
    out_file.close()


wd = os.getcwd()
wd = os.getcwd()

work_sapce_dir = os.path.join(wd, PATH+"/")

annotation_dir = os.path.join(work_sapce_dir, "Annotations/")
if not os.path.isdir(annotation_dir):
    os.mkdir(annotation_dir)
clear_hidden_files(annotation_dir)
image_dir = os.path.join(work_sapce_dir, "JPEGImages/")
if not os.path.isdir(image_dir):
    os.mkdir(image_dir)
clear_hidden_files(image_dir)
yolo_labels_dir = os.path.join(work_sapce_dir, "YOLOLabels/")
if not os.path.isdir(yolo_labels_dir):
    os.mkdir(yolo_labels_dir)
clear_hidden_files(yolo_labels_dir)

yolov5_train_dir = os.path.join(work_sapce_dir, "train/")
if not os.path.isdir(yolov5_train_dir):
    os.mkdir(yolov5_train_dir)
clear_hidden_files(yolov5_train_dir)
yolov5_images_train_dir = os.path.join(yolov5_train_dir, "images/")
if not os.path.isdir(yolov5_images_train_dir):
    os.mkdir(yolov5_images_train_dir)
clear_hidden_files(yolov5_images_train_dir)
yolov5_labels_train_dir = os.path.join(yolov5_train_dir, "labels/")
if not os.path.isdir(yolov5_labels_train_dir):
    os.mkdir(yolov5_labels_train_dir)
clear_hidden_files(yolov5_labels_train_dir)

yolov5_test_dir = os.path.join(work_sapce_dir, "val/")
if not os.path.isdir(yolov5_test_dir):
    os.mkdir(yolov5_test_dir)
clear_hidden_files(yolov5_test_dir)
yolov5_images_test_dir = os.path.join(yolov5_test_dir, "images/")
if not os.path.isdir(yolov5_images_test_dir):
    os.mkdir(yolov5_images_test_dir)
clear_hidden_files(yolov5_images_test_dir)
yolov5_labels_test_dir = os.path.join(yolov5_test_dir, "labels/")
if not os.path.isdir(yolov5_labels_test_dir):
    os.mkdir(yolov5_labels_test_dir)
clear_hidden_files(yolov5_labels_test_dir)


train_file = open(os.path.join(wd, "yolov5_train.txt"), 'w', encoding='utf-8')
test_file = open(os.path.join(wd, "yolov5_valid.txt"), 'w', encoding='utf-8')
train_file.close()
test_file.close()
train_file = open(os.path.join(wd, "yolov5_train.txt"), 'a', encoding='utf-8')
test_file = open(os.path.join(wd, "yolov5_valid.txt"), 'a', encoding='utf-8')
list_imgs = os.listdir(image_dir)  # list image files
prob = random.randint(1, 100)
print("数据集: %d个" % len(list_imgs))
for i in range(0, len(list_imgs)):
    path = os.path.join(image_dir, list_imgs[i])
    if os.path.isfile(path):
        image_path = image_dir + list_imgs[i]
        voc_path = list_imgs[i]
        (nameWithoutExtention, extention) = os.path.splitext(
            os.path.basename(image_path))
        (voc_nameWithoutExtention, voc_extention) = os.path.splitext(
            os.path.basename(voc_path))
        annotation_name = nameWithoutExtention + '.xml'
        annotation_path = os.path.join(annotation_dir, annotation_name)
        label_name = nameWithoutExtention + '.txt'
        label_path = os.path.join(yolo_labels_dir, label_name)
    prob = random.randint(1, 100)
    print("Probability: %d" % prob, i, list_imgs[i])
    if (prob < TRAIN_RATIO):
        # train dataset
        if os.path.exists(annotation_path):
            train_file.write(image_path + '\n')
            convert_annotation(nameWithoutExtention)  # convert label
            copyfile(image_path, yolov5_images_train_dir + voc_path)
            copyfile(label_path, yolov5_labels_train_dir + label_name)
    else:
        # test dataset
        if os.path.exists(annotation_path):
            test_file.write(image_path + '\n')
            convert_annotation(nameWithoutExtention)  # convert label
            copyfile(image_path, yolov5_images_test_dir + voc_path)
            copyfile(label_path, yolov5_labels_test_dir + label_name)
train_file.close()
test_file.close()
2.4.2 YOLO格式数据集
yolo格式数据集通常为如下结构:
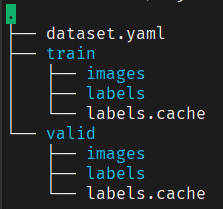
这种数据集不用做任何处理,只需将dataset.yaml内容修改为pytorch-docker环境下的绝对路径即可,如下参考:
train: /workspace/Helmet/image-data/train/images
val: /workspace/Helmet/image-data/valid/images
nc: 2
names:
  - belt
- nobelttrain: 容器环境下训练数据集绝对路径;
val: 容器环境下验证数据集绝对路径;
nc: 数据集类别数量
names: 数据集类别名称
修改后将dataset.yaml拷贝到源码data目录下,后续在train.py训练代码中--data参数设置为data/dataset.yaml。
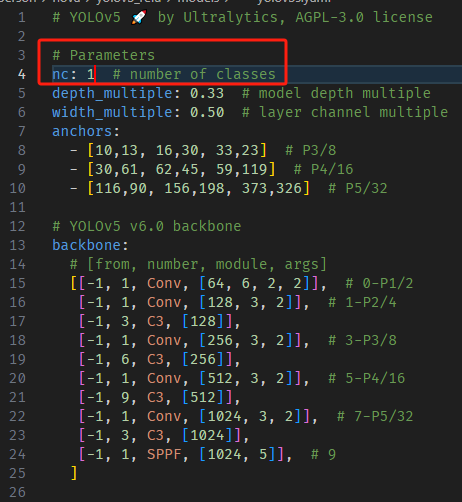
2.5 修改模型文件
models下有5个模型,smlx需要训练的时间依次增加,按照需求选择一个文件进行修改即可,我选择yolov5s.yaml;
只需将nc改为实际值即可;

yolov5s.yaml修改nc为实际值;
2.6 修改训练tran.py
这里需要对train.py文件内的参数进行修改,weights,cfg,data按照自己所需文件的路径修改,weights如果使用参考博客的文件,将yolov5s.pt下载放到代码根目录下即可,如果使用官方则无需修改,会自行下载。具体参数含义,查看官方文档。我修改内容如下:
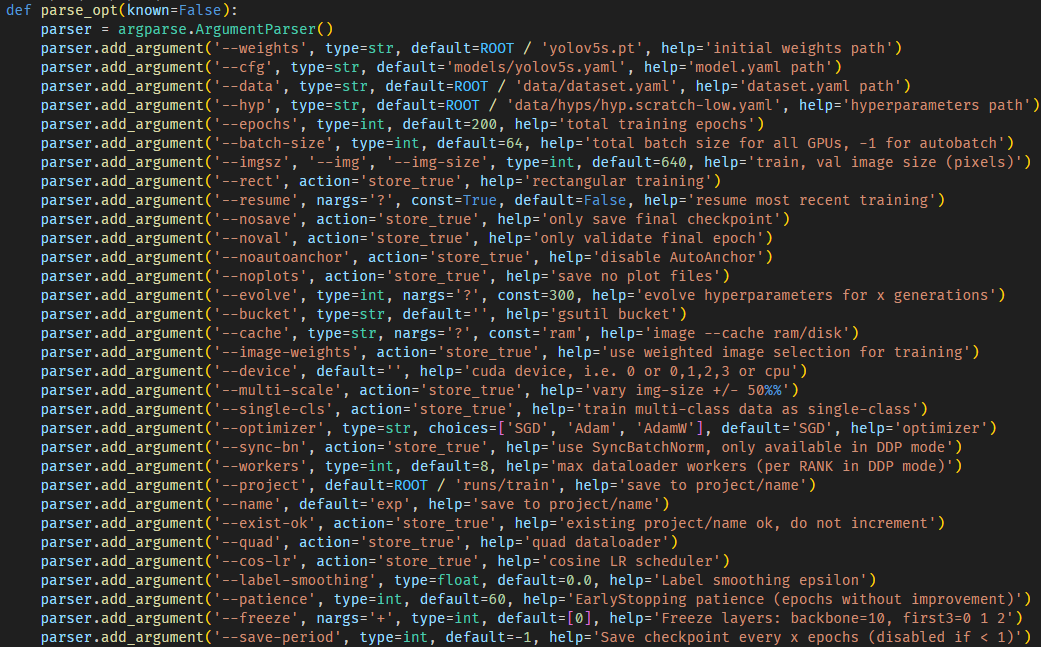
主要修改了以下几项:
cfg :训练配置文件;
data : 训练数据集配置文件;
epochs : 训练迭代轮数;
batch-size :每次迭代送入神经网络进行训练的图片数量,需为16倍数,根据GPU显存设置,越大越耗显存,训练速度越快;
imgsz : 训练指定输入图片的尺寸,所有输入图片在送入模型前都会被resize成指定的大小,尺寸大检测小目标效果好,训练慢,反之精度差,训练快;
patience :早停机制,迭代多少轮验证指标(如val_loss、mAP)不提升,就提前停止训练,以防止过拟合、节省资源;
2.7 开始训练
执行python train.py
可能报以下错误:
All git commands will error until this is rectified错误提示
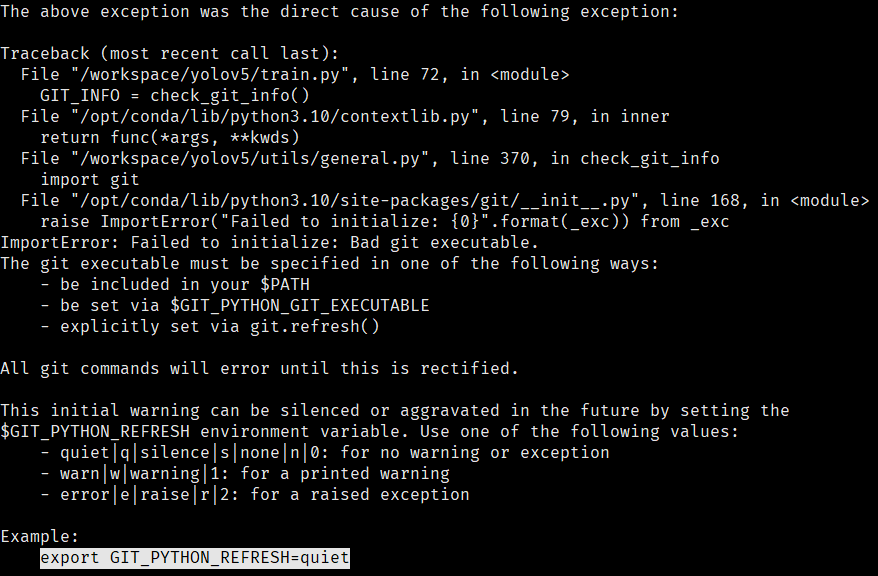
按照提示执行export GIT_PYTHON_REFRESH=quiet继续执行训练命令,就可以开始训练了。
卡在
not pretrained!!!!!!!!!!!!!!!!!!!!
如果误将data/images/自带的两张测试图片删除,会卡在not pretrained!!!!!!!!!!!!!!!!!!!!后,AMP: checks passed前,解决方式可以将图片下载下来重新放回,也可以修改utils/general.py按照如下修改:
im = f if f.exists() else 'https://ultralytics.com/images/bus.jpg' if False else np.ones((640, 640, 3))
# im = f if f.exists() else 'https://ultralytics.com/images/bus.jpg' if check_online() else np.ones((640, 640, 3))
下载
Arial.ttf字体错误
手动下载Arial.ttf 字体文件,放到docker环境下的/root/.config/Ultralytics/文件夹下;
获取git信息错误
删除.git文件夹
2.8 验证训练结果
训练结束后在代码根目录下执行检测命令,可以将待检测图片放到data/samples目录下执行
python detect.py --weights runs/train/exp/weights/best.pt --source data/samples/ --device 0 --data data/fall.yaml注意: 每训练一次都会在runs/train/目录下新创建一个exp加数字文件夹,运行测试用例时选择最新的,测试结果也会保存在runs/detect目录下最新的exp文件夹下
2.9 导出模型
以导出onnx为例,执行以下命令:
# 安装onnx支持
pip3 install onnxsim -i http://mirrors.aliyun.com/pypi/simple/ --trusted-host mirrors.aliyun.com
# 导出[640,480]模型
# parser.add_argument('--imgsz', '--img', '--img-size', nargs='+', type=int, default=[640, 640], help='image (h, w)') 尺寸 h在前
python export.py --weights runs/train/exp8/weights/best.pt --img-size 480 640 --batch 1 --device 0 --opset 12 --optimize --dynamic --include onnx --device cpu
3. 异常解决
3.1. Docker 守护进程无法找到具备 GPU 能力的设备驱动
docker: Error response from daemon: could not select device driver ““ with capabilities: [[gpu]].检查主机 GPU 和 NVIDIA 驱动是否正常工作
nvidia-smi检查 NVIDIA 容器工具包是否安装
dpkg -l | grep nvidia-container-toolkit如果没有任何信息,则使用以下命令安装:
distribution=$(. /etc/os-release;echo $ID$VERSION_ID) \
    && curl -s -L https://nvidia.github.io/nvidia-docker/gpgkey | sudo apt-key add - \
    && curl -s -L https://nvidia.github.io/nvidia-docker/$distribution/nvidia-docker.list | sudo tee /etc/apt/sources.list.d/nvidia-docker.list
sudo apt update
sudo apt install -y nvidia-container-toolkit
sudo systemctl restart docker
为Docker添加NVIDIA配置
修改/etc/docker/daemon.json 文件追加以下内容:
{
	"default-runtime": "nvidia",
	"runtimes": {
		"nvidia": {
			"path": "nvidia-container-runtime",
			"runtimeArgs": []
		}
	}
}保存后重启sudo systemctl restart docker
3.1. RuntimeError: Numpy is not available
这是因为Numpy版本太高,将现有Numpy卸载
pip uninstall numpy安装numpy=1.26.4,解决此问题
pip install numpy==1.26.4 -i https://pypi.tuna.tsinghua.edu.cn/simple
评论区